This holiday season I wanted to make some custom jigsaw puzzle gifts. The plan:
- Write a jigsaw puzzle generator.
- Use a laser cutter to cut them out1. (so much fun!)
Randomly generating puzzles is a nice problem for beginners and tinkerers, so I wanted to write up the approach that I came up with. I'd love to hear from you if you attempted to do something similar, especially if you came up with different solutions.
I used Elm, because it has a nice way to produce SVGs, and it happens to be the frontend language I know best.
Intro
Sidenote: This post turned out to be longer than I anticipated! If you just want to skip straight to the code, it's at https://github.com/2mol/jigsaw-tutorial/.
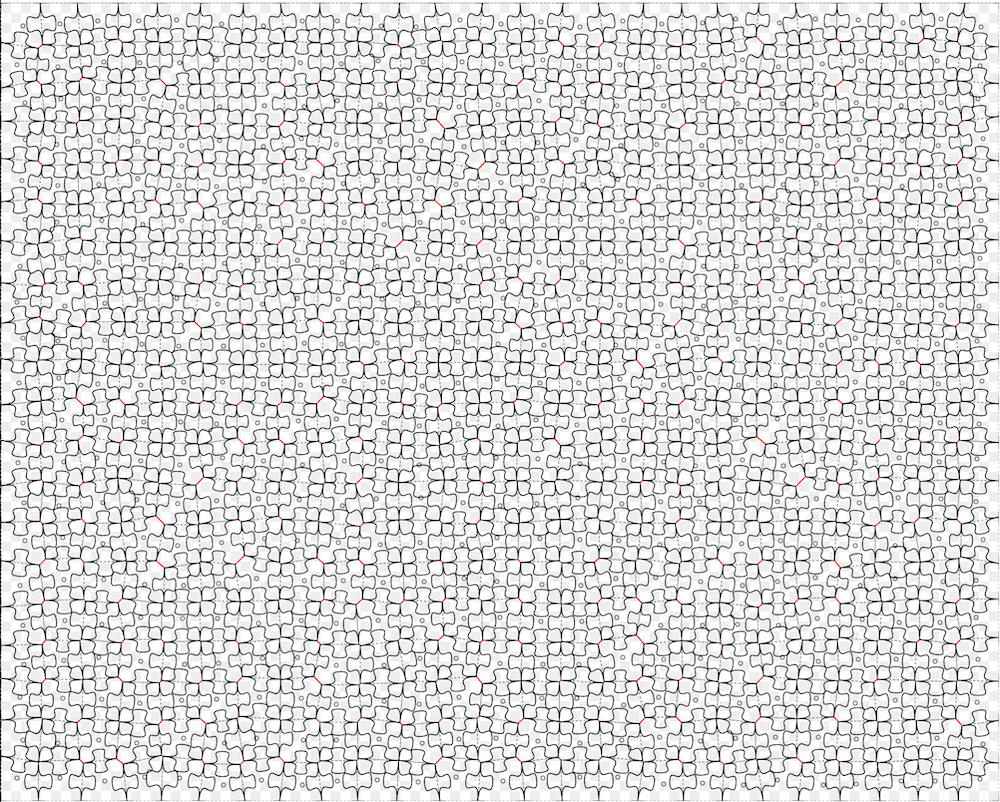
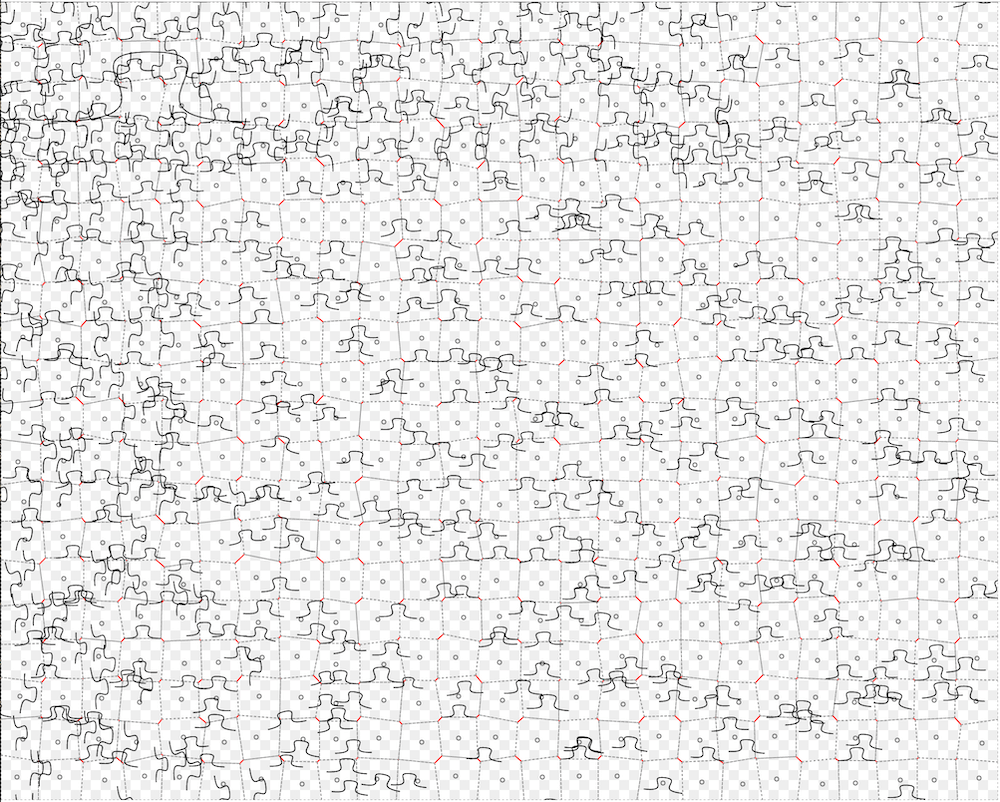
I actually made two attempts, the first one being based on generating a Voronoi tesselation and making heavy use of elm-geometry. That approach had some subtle problems2, which made me go back to the drawing board for a second attempt.
I will not describe that approach in much detail, instead I'll walk you through a fully working solution based on my second attempt. However, if you're interested, you can have a look at my messy original code repo at https://github.com/2mol/elm-jigsaw.
Here is how I broke down the problem:
- Generate a grid with square pieces.
- Randomly move all the inner corners of the grid a little bit.
- Replace the edges with a tongue shape.
- Save the SVG.
That's it for the high level view! It turns out however that you need to solve some smaller problems to make it work. You can have a look at the code on Ellie or the code repo of this tutorial.
See possible improvements below for some ideas about how to make the puzzles better, or polish the overall tool.
Here is what we'll try to achieve:

Setting up your Elm project
I'll assume that you have the Elm compiler installed. Here is everything you need to initialise the project:
mkdir jigsaw-tutorial
cd jigsaw-tutorial
elm init
elm install elm/random
elm install elm/svg
elm install elm-community/list-extra
Now create src/Main.elm, launch elm reactor in the commandline, and open http://localhost:8000/src/
Let me give you a skeleton for Main.elm. The commented out imports will be needed in a second, so feel free to uncomment them already:
module Main exposing (main)

-- import Dict exposing (Dict)
-- import List.Extra as List
-- import Random
import Svg exposing (Svg)
import Svg.Attributes exposing (..)

main : Svg msg
main =
    Svg.svg
        [ width "800"
        , height "600"
        , viewBox "0 0 800 600"
        ]
        [ Svg.rect
            [ x "0", y "0"
            , width "100", height "100"
            ]
            []
        ]
So already I'm not super loving two things:
- I have to repeat the dimensions in two places, and they are strings.
- I don't have a nice canvas backdrop that gives me visual feedback about where my drawing window is.
I fixed this with a convenience function that parametrises the dimensions and draws a checkered background pattern. The code to this is not terribly interesting, but you can have a look at it here, or use it interactively in Ellie here. It will look like this:

Amazing! With that out of the way, we start solving the actual problem.
Generate a grid
With the benefit of hindsight, we'll abstract a couple of things: let's define some basic types and a top-level record that holds the parameters of our puzzle:
module Main exposing (main)

-- [...]

puzzle =
    { piecesX = 12
    , piecesY = 6
    -- , gridPerturb = 6
    -- , seed = Random.initialSeed 666
    -- , draftMode = False
    , pixelsPerCell = 50
    }

type alias Point =
    { x : Int
    , y : Int
    }

-- type alias Edge =
--     { start : Point
--     , end : Point
--     }
Again, the commented out parts are to give you a taste of what we'll need in a minute.
Now we need to make a grid of square pieces. Some thoughts:
- A grid is a 2-dimensional list of corner points, but it is also a list of edges. Which one you generate depends on what you want to do with it.
- Our units will be pixels.
- We might want to keep the coordinates of the pieces separate from the numbering of the pieces. I often confused the two!
- Carrying over this numbering when we work on edges takes some care, but it will be useful later when we want to sort the paths.
With this in mind, I decided to describe my grid as a Dict of points. The keys are tuples that correspond to my (x, y) numbering of the pieces, and the points themselves contain their coordinates..
With a bit of programming 101, here is the function that gives us a dictionary of corner points for our grid:
rectangularGrid : Int -> Int -> Dict ( Int, Int ) Point
rectangularGrid nx ny =
    let
        indicesX =
            List.range 0 nx

        indicesY =
            List.range 0 ny

        indices =
            List.lift2 Tuple.pair indicesX indicesY
    in
    indices
        |> List.map
            (\( ix, iy ) ->
                ( ( ix, iy )
                , { x = ix * puzzle.pixelsPerCell
                  , y = iy * puzzle.pixelsPerCell
                  }
                )
            )
        |> Dict.fromList
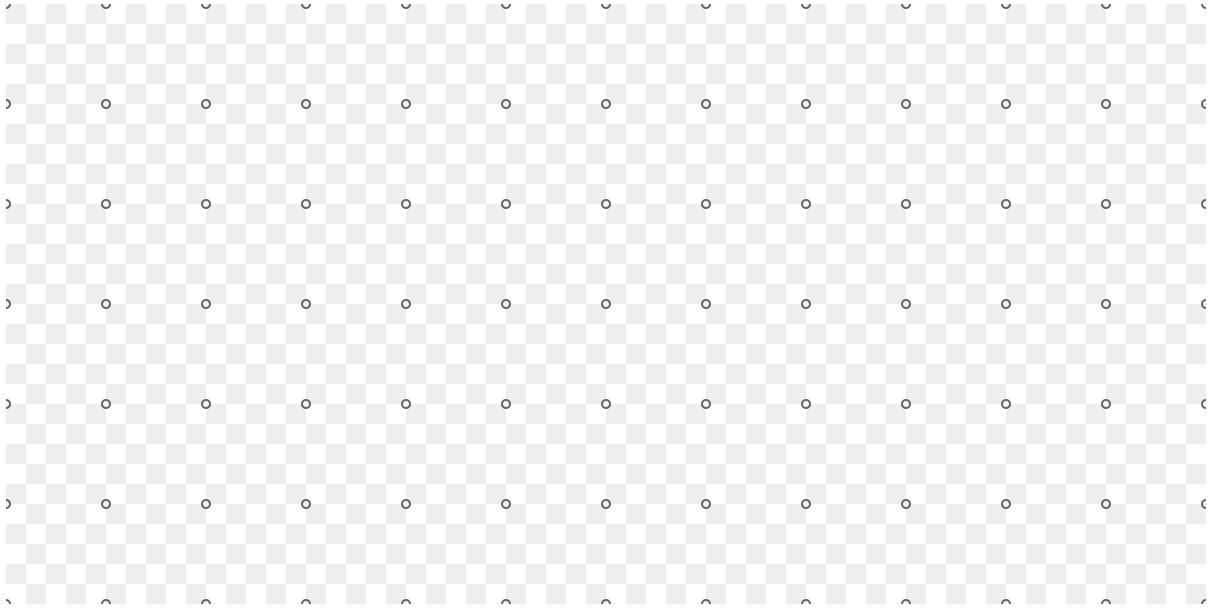
Unless we can draw this, it's not going to be very useful. So let's draw some points
main : Svg msg
main =
    let
        grid =
            rectangularGrid puzzle.piecesX puzzle.piecesY

        markers =
            Dict.values grid
                |> List.map drawMarker
    in
    canvas params.width params.height
        markers

-- DRAWING FUNCTIONS

drawMarker : Point -> Svg msg
drawMarker { x, y } =
    Svg.circle
        [ cx <| String.fromInt x
        , cy <| String.fromInt y
        , r "2"
        , stroke "#666"
        , fillOpacity "0"
        ]
        []
Checkpoint: you can look at this on Ellie, or browse the code repo at this point in time.
This seems nice, but unfortunately we still have some work to do. We ultimately want to work with edges, not corners. The challenge is therefore to find a function with the following type signature:
type alias Point =
    { x : Int
    , y : Int
    }

type alias Edge =
    { start : Point
    , end : Point
    }

calcEdges : Dict ( Int, Int ) Point -> List Edge
calcEdges = ???
This is the kind of stuff I like solving as a programming exercise, so if you want to do that, now's the time.
Here is one solution:
calcEdges : Dict ( Int, Int ) Point -> List Edge
calcEdges grid =
    let
        maybeConnect indices point =
            Dict.get indices grid
                |> Maybe.map (\point2 -> { start = point, end = point2 })

        horizontals =
            grid
                |> Dict.map (\( ix, iy ) point -> maybeConnect ( ix + 1, iy ) point)
                |> Dict.toList
                |> List.sortBy (\( ( _, iy ), _ ) -> iy)
                |> List.map Tuple.second
                |> List.filterMap identity

        verticals =
            grid
                |> Dict.map (\( ix, iy ) point -> maybeConnect ( ix, iy + 1 ) point)
                |> Dict.toList
                |> List.sortBy (\( ( ix, _ ), _ ) -> ix)
                |> List.map Tuple.second
                |> List.filterMap identity
    in
    horizontals ++ verticals
It might be slightly more complicated than necessary, but I really wanted to have control over the sorting order.
Again, let's draw this:
main : Svg msg
main =
    let
        grid =
            rectangularGrid puzzle.piecesX puzzle.piecesY

        markers =
            Dict.values grid
                |> List.map drawMarker

        edges =
            calcEdges grid
    in
    canvas params.width params.height
        [ Svg.g [] markers
        , Svg.g [] <| List.map drawEdge edges
        ]

-- DRAWING FUNCTIONS

drawEdge : Edge -> Svg msg
drawEdge { start, end } =
    Svg.line
        [ x1 <| String.fromInt start.x
        , y1 <| String.fromInt start.y
        , x2 <| String.fromInt end.x
        , y2 <| String.fromInt end.y
        , strokeWidth "1"
        , stroke "#c66"
        ]
        []
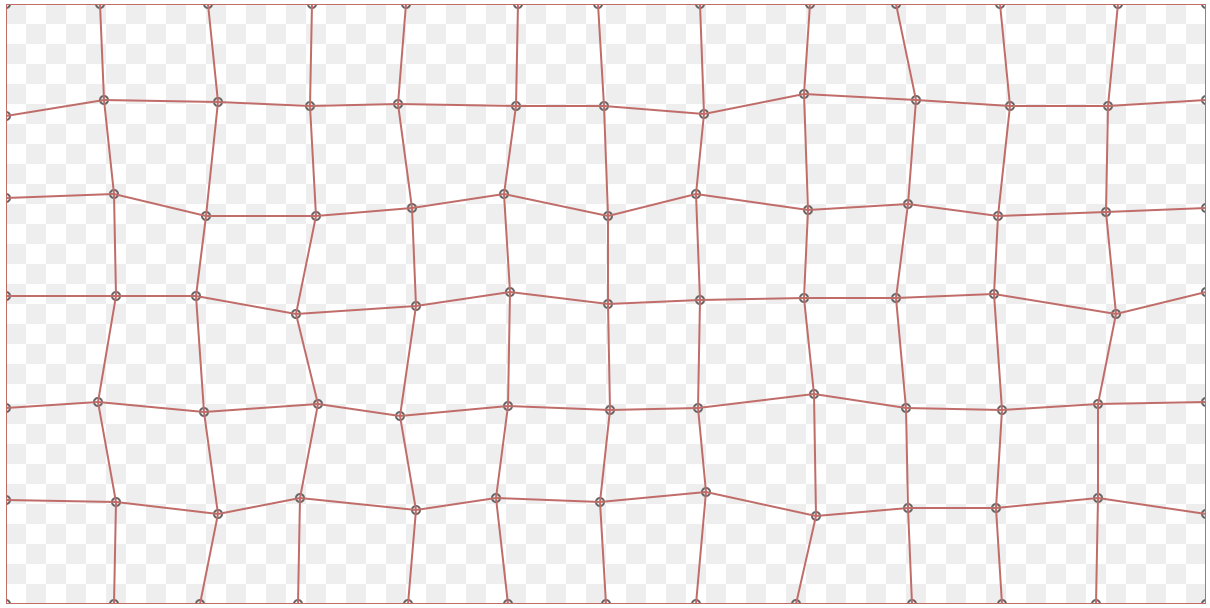
Progress! This is what it looks like:
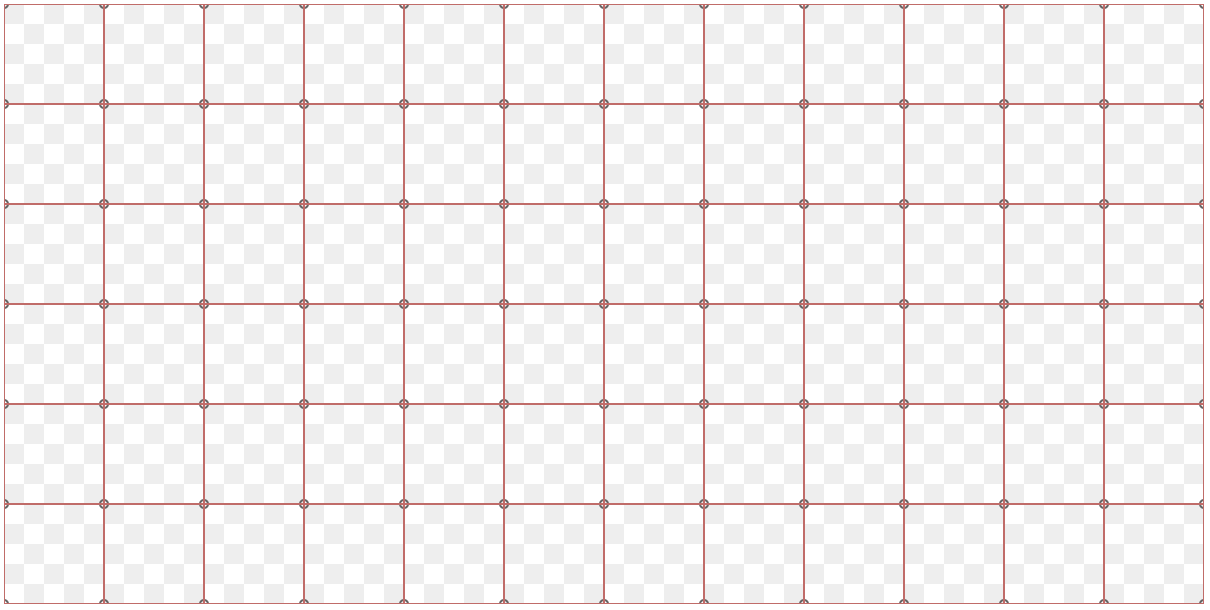
Here are the checkpoints for Ellie and the code repo for this step.
Wiggle the grid
Time to make this grid less boring. The advantage with the setup we chose is that it's now possible to have a function that just transforms a grid Dict into another grid Dict. Here are the new pieces of code:
module Main exposing (main)

-- ...
import Random

puzzle =
    { draftMode = True
    , piecesX = 12
    , piecesY = 6
    , pixelsPerCell = 50
    , seed = Random.initialSeed 666
    , gridPerturb = 6
    }

perturbGrid : Dict ( Int, Int ) Point -> Dict ( Int, Int ) Point
perturbGrid grid =
    let
        pert =
            puzzle.gridPerturb

        randomPair =
            Random.pair
                (Random.int -pert pert)
                (Random.int -pert pert)

        randomPairListGen =
            Random.list (Dict.size grid) randomPair

        ( randomPairList, _ ) =
            Random.step randomPairListGen puzzle.seed
    in
    Dict.values grid
        |> List.map2 (\( rx, ry ) point -> { x = point.x + rx, y = point.y + ry }) randomPairList
        -- optional: keep borders straight
        |> List.map snapToBorder
        |> List.map2 Tuple.pair (Dict.keys grid)
        |> Dict.fromList


snapToBorder : Point -> Point
snapToBorder { x, y } =
    { x = snapToBorder_ puzzle.gridPerturb params.width x
    , y = snapToBorder_ puzzle.gridPerturb params.height y
    }


snapToBorder_ : Int -> Int -> Int -> Int
snapToBorder_ howClose maxCoord coord =
    if coord - howClose <= 0 then
        0

    else if coord + howClose >= maxCoord then
        maxCoord

    else
        coord
Again, this is mostly simple code, but it was fairly tricky to use Random the right way. It's easy to fall into the trap of using the same seed for a list of things, getting the same perturbation everywhere.
The rest of the above consists of some mundane logic to snap the outer edges back into the rectangular border shape. You could skip this to get a more interesting puzzle!
Yay. Ellie and code checkpoints.
Puzzle edge shapes
It doesn't look like much yet, but everything is goint to fall into place with this next step.
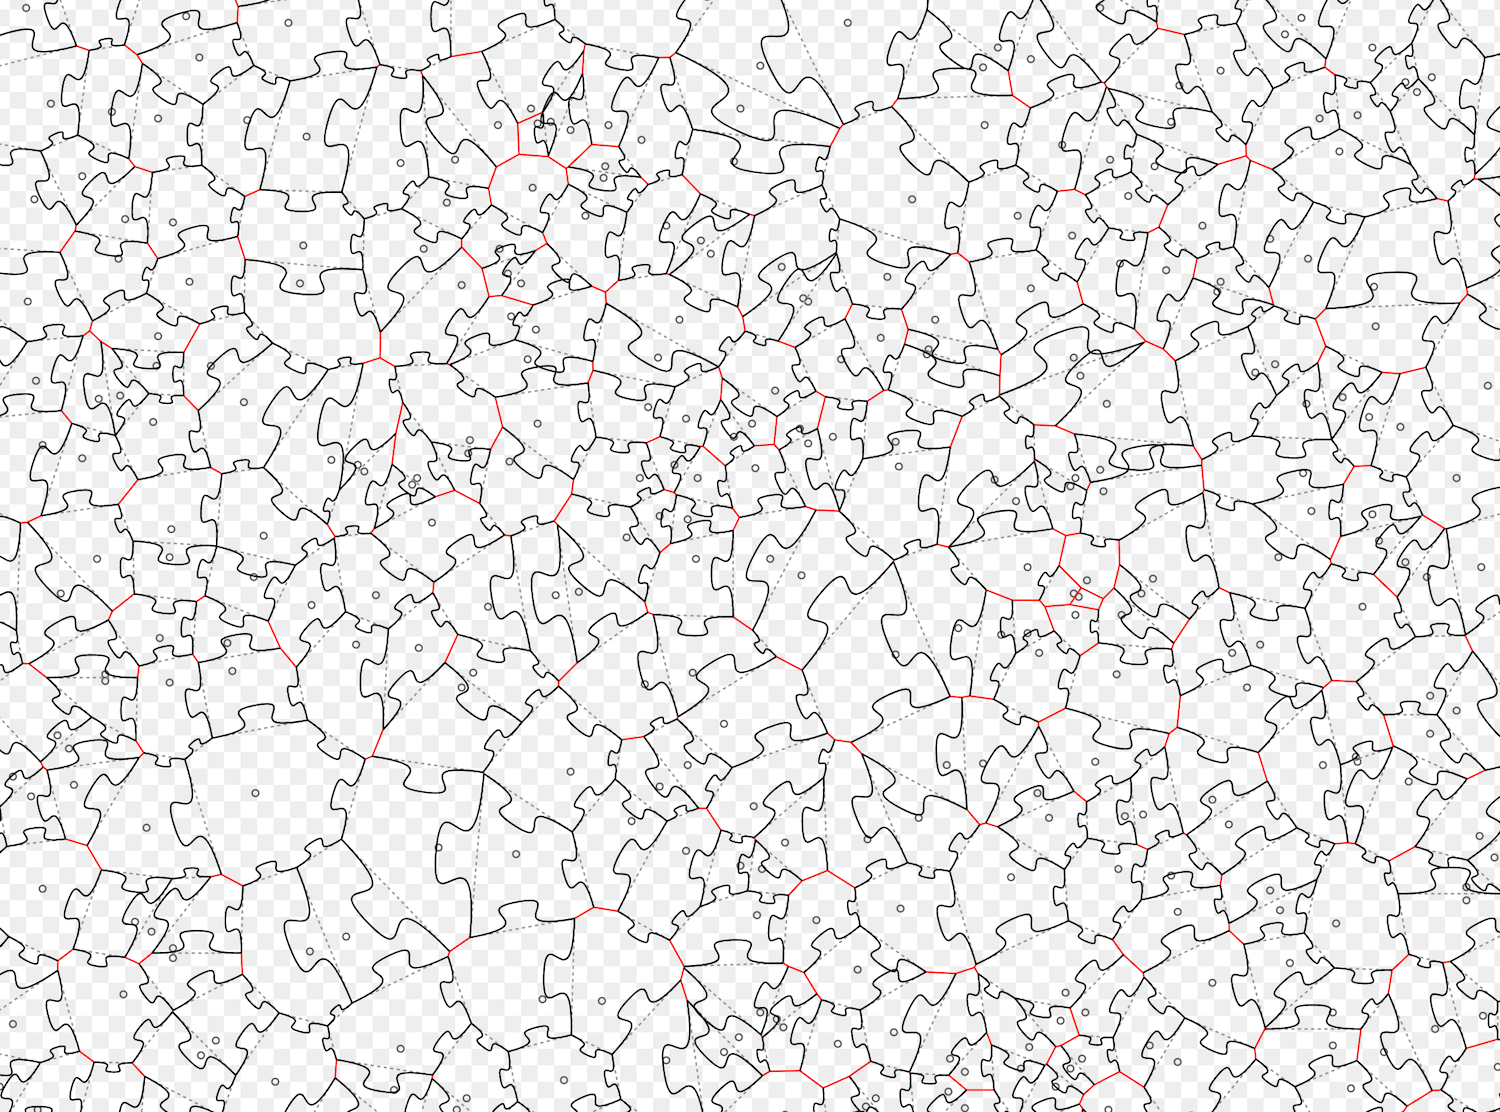
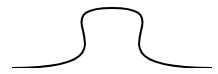
The idea is to replace each inner edge with a typical puzzle tongue shape to create the interlocking parts. We basically want this thing everywhere:
It helps to have a basic intuition about Bézier curves. For the syntax itself, I have to admit that I had to stare at the explanation for SVG paths quite a bit.
Basically, there is a syntax for cubic splines (a curve with two points and two control points), and then there is a special syntax for chaining a bunch of them together. We're looking to generate something like this:
<svg>
  <path d="M 10 80 C 40 10, 65 10, 95 80 S 150 150, 180 80"/>
</svg>
The coordinates above are for the points on the curve, and their respective control points. The letters are a way to tag which is which, but then also one of the control point is omitted, because it's symmetrical to the previous one.
Super easy to get confused! For example the endpoint is the only one where the control point coordinates are specified before the point itself... Time to define a record type to keep track of which coordinate pair means what.
Here it is, along with its drawing function:
type alias Curve3 =
    { start : Point
    , startControl : Point
    , middle : Point
    , middleControl : Point
    , endControl : Point
    , end : Point
    }

drawCurve3 : Curve3 -> Svg msg
drawCurve3 curve =
    let
        m =
            [ "M"
            , String.fromInt curve.start.x
            , String.fromInt curve.start.y
            ]

        c =
            [ "C"
            , String.fromInt curve.startControl.x
            , String.fromInt curve.startControl.y
            , String.fromInt curve.middleControl.x
            , String.fromInt curve.middleControl.y
            , String.fromInt curve.middle.x
            , String.fromInt curve.middle.y
            ]

        s =
            [ "S"
            , String.fromInt curve.endControl.x
            , String.fromInt curve.endControl.y
            , String.fromInt curve.end.x
            , String.fromInt curve.end.y
            ]

        pathString =
            [ m, c, s ]
                |> List.map (String.join " ")
                |> String.join ""
    in
    Svg.path
        [ stroke "black"
        , fill "none"
        , d pathString
        ]
        []
Try it out on Ellie or read the full code.
Now we have one last fun problem to solve. Given an edge, fit the tongue shape into it. There should also be a parameter that decides which way to flip the piece. I used a boolean, but it would be good to define a proper type like
type FlipDirection = OneWay | TheOtherway
Generating these randomly is exactly as easy as generating a list of Bool, so boo for my laziness.
Ok, do this:
makeTongue : Bool -> Edge -> Curve3
makeTongue = ???
Did you try?
Here's my way of doing it. It's basically a linear interpolation between the edges and the curve points. This is definitely something that is a lot nicer to do with elm-geometry, since you can just define a base shape and then rotate, translate, and scale it in the right way.
makeTongue : Bool -> Edge -> Curve3
makeTongue flip { start, end } =
    let
        vEdge =
            { x = end.x - start.x
            , y = end.y - start.y
            }

        vPerp =
            if start.y /= end.y then
                { x = 1
                , y = toFloat -vEdge.x / toFloat vEdge.y |> round
                }

            else
                --if start.x /= end.x
                { x = toFloat -vEdge.y / toFloat vEdge.x |> round
                , y = 1
                }

        flipMult =
            if flip then
                -1

            else
                1

        vPerpN =
            { x = flipMult * toFloat vPerp.x / norm vPerp |> round
            , y = flipMult * toFloat vPerp.y / norm vPerp |> round
            }

        middleScale =
            toFloat puzzle.pixelsPerCell * 0.18 |> round

        scaleV h vect =
            { x = toFloat vect.x * h |> round
            , y = toFloat vect.y * h |> round
            }

        scale h n =
            toFloat n * h |> round

        middle =
            { x = (vPerpN.x * middleScale) + scale 0.5 (start.x + end.x)
            , y = (vPerpN.y * middleScale) + scale 0.5 (start.y + end.y)
            }
    in
    { start = Point start.x start.y
    , startControl = Point (start.x + scale 0.8 vEdge.x) (start.y + scale 0.8 vEdge.y)
    , middleControl = Point (middle.x - scale 0.4 vEdge.x) (middle.y - scale 0.4 vEdge.y)
    , middle = Point middle.x middle.y
    , endControl = Point (end.x - scale 0.8 vEdge.x) (end.y - scale 0.8 vEdge.y)
    , end = Point end.x end.y
    }

-- The norm (length) of a vector.
norm : Point -> Float
norm vect =
    (vect.x ^ 2 + vect.y ^ 2)
        |> toFloat
        |> sqrt
There are definitely a bunch of magic numbers in the above, but since I had to get it done, there wasn't any time to create a nicer abstraction. But it works, so I'm not too bothered.
Let's hook it all up! I'll let you figure out for yourself what some of the additional code does.
main : Svg msg
main =
    let
        cnvs =
            canvas params.width params.height

        grid =
            rectangularGrid puzzle.piecesX puzzle.piecesY
                |> perturbGrid

        markers =
            Dict.values grid
                |> List.map drawMarker

        isOnBorder edge =
            False
                || (edge.start.x == 0 && edge.end.x == 0)
                || (edge.start.y == 0 && edge.end.y == 0)
                || (edge.start.x == params.width && edge.end.x == params.width)
                || (edge.start.y == params.height && edge.end.y == params.height)

        edges =
            calcEdges grid
                |> List.filter (not << isOnBorder)

        ( flips, _ ) =
            Random.uniform True [ True, False ]
                |> Random.list (List.length edges)
                |> (\l -> Random.step l puzzle.seed)

        tongues =
            List.map2 makeTongue flips edges

        border =
            Svg.rect
                [ x "0"
                , y "0"
                , width (String.fromInt params.width)
                , height (String.fromInt params.height)
                , fillOpacity "0"
                , stroke "black"
                ]
                []
    in
    cnvs <|
        if puzzle.draftMode then
            [ Svg.g [] <| List.map drawCurve3 tongues
            , border
            , Svg.g [] markers
            , Svg.g [] <| List.map drawEdge edges
            ]

        else
            [ Svg.g [] <| List.map drawCurve3 tongues
            , border
            ]
One last time, you can see everything together in Ellie, or have a look at the final code.
Let's see the result:
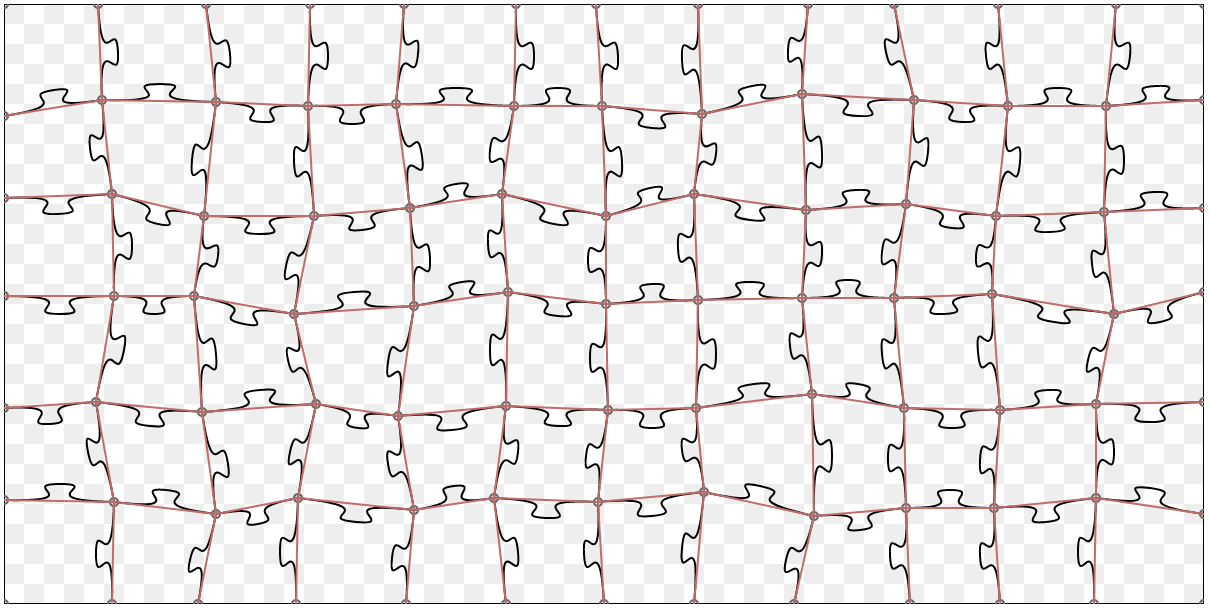
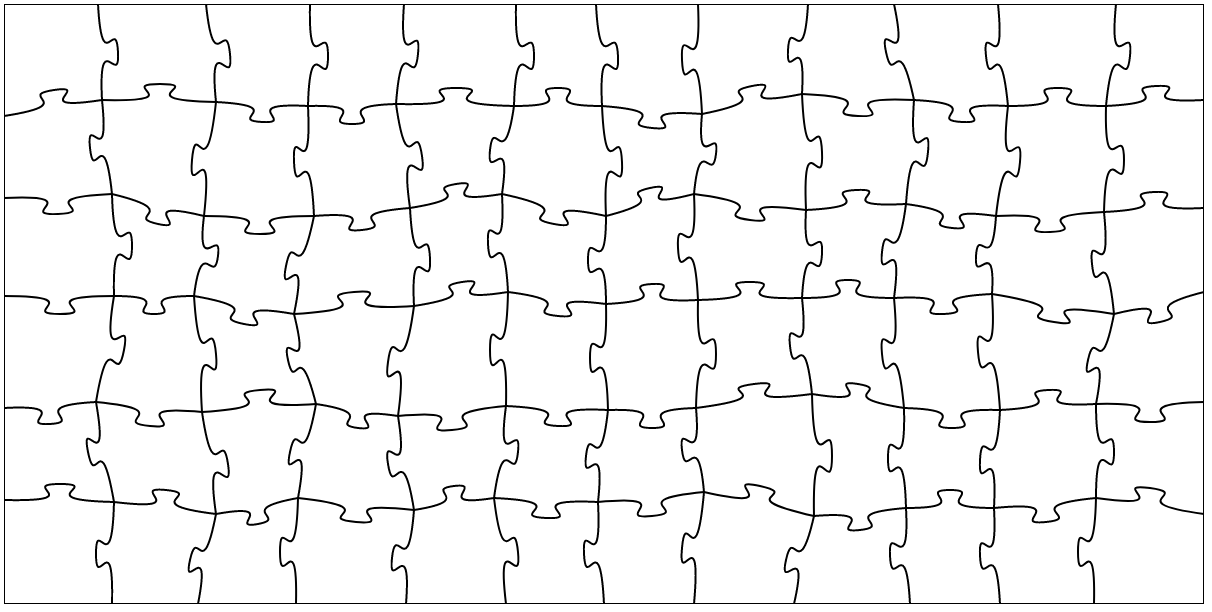
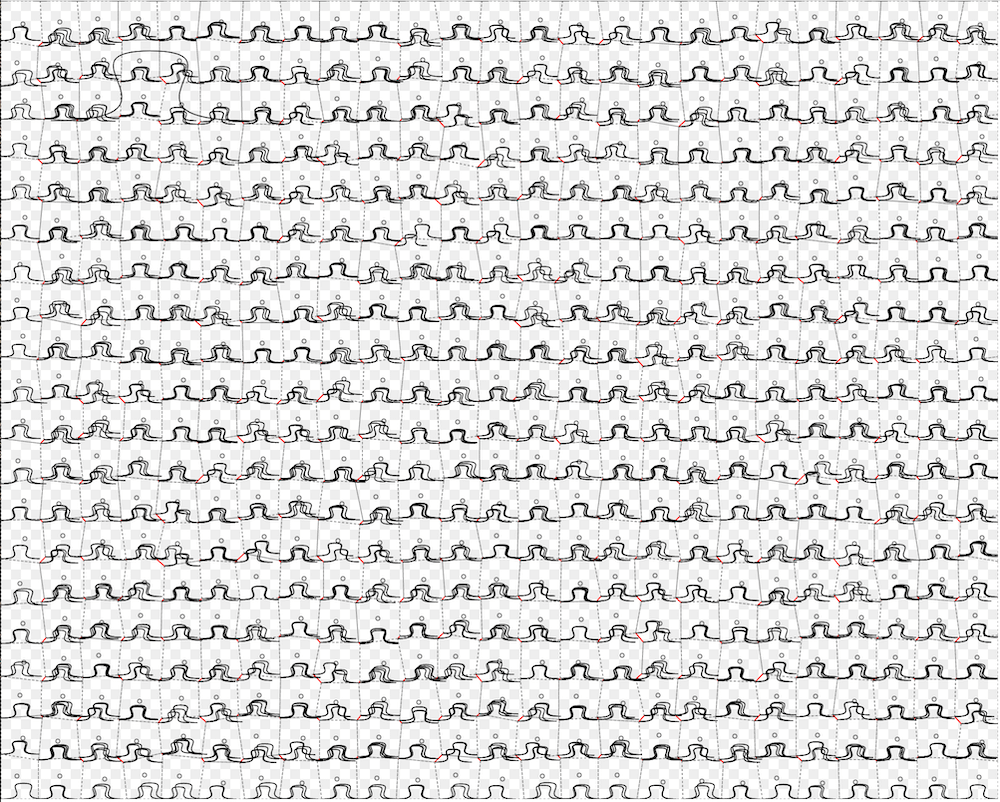
Switch draftMode to False, and you can see the final puzzle in all its glory:
Extract the SVG
One important thing I almost forgot! You've now generated some fantastic SVG code, but how do you get it out? I really had no more time to display the DOM string, so I just did it the simplest way possible: copy-paste the generated SVG from the site's source code:
...
This is so dumb, but these kind of quick & hacky solutions make me very happy! Obviously if you wanted to export an hundred of these you could easily display the svg string, or even hook it up to a button that copies it into your clipboard. If you know of a way to make elm download an svg file generated from this, let me know.
Save this as an .svg file, or use some feature/plugin for your vector graphics editor. I used SVG-insert because I happen to use Sketch.
Conclusion
This tutorial only shows the final happy path. It took a little bit of work to come up with a nice way to express and solve this problem, so don't be frustrated if you get stuck on some seemingly simple parts. Jump to the fun failures below to see some of the garbage I produced to get here.
I'm sure there are lots of improvements to be done, but I'm quite happy with the readability and the flexibility of the code.
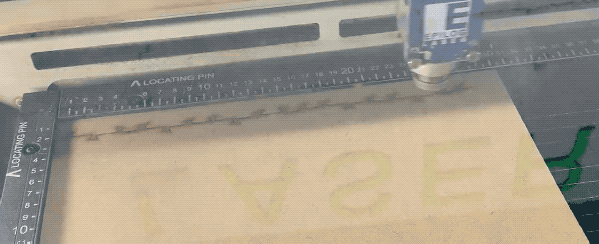
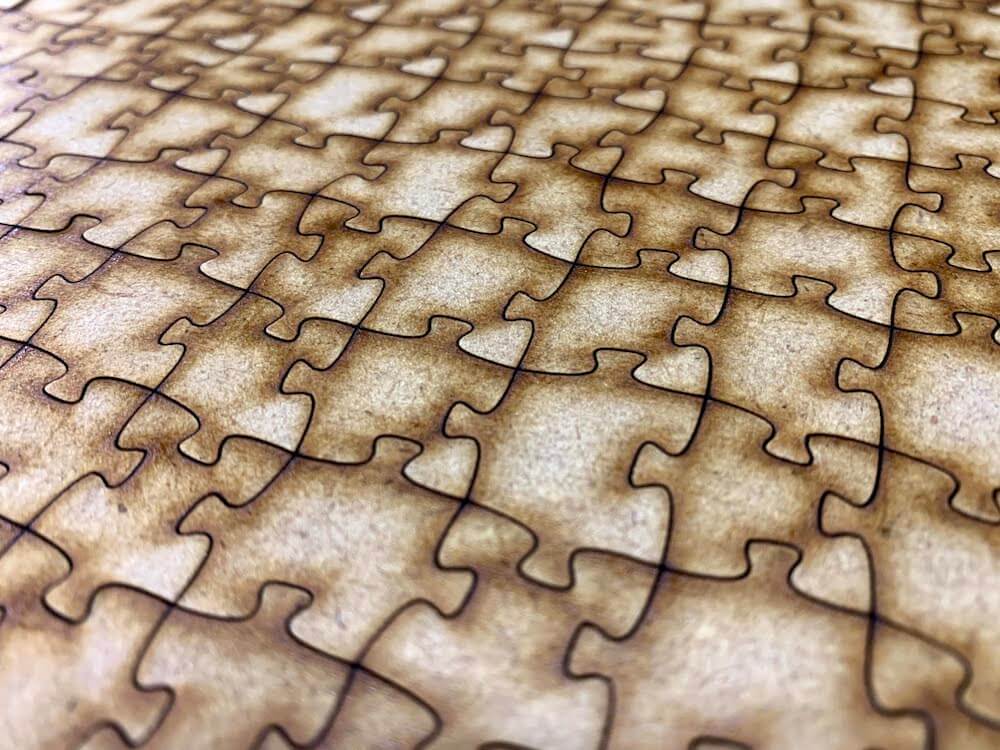
Here are a bunch of photos of the physical result of all this work.
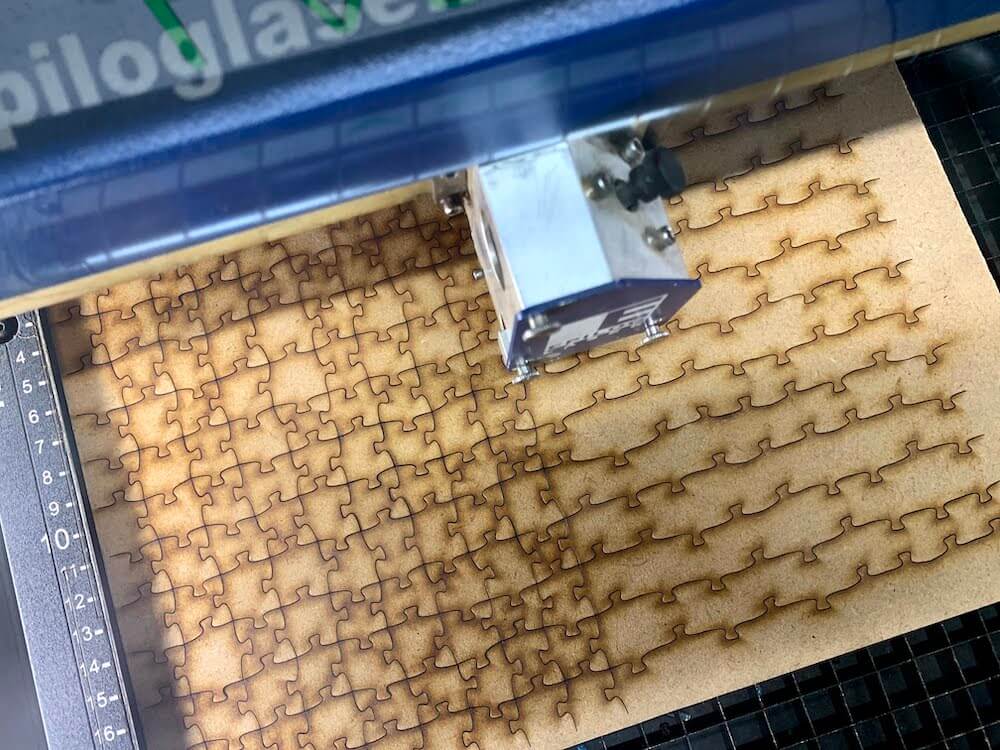
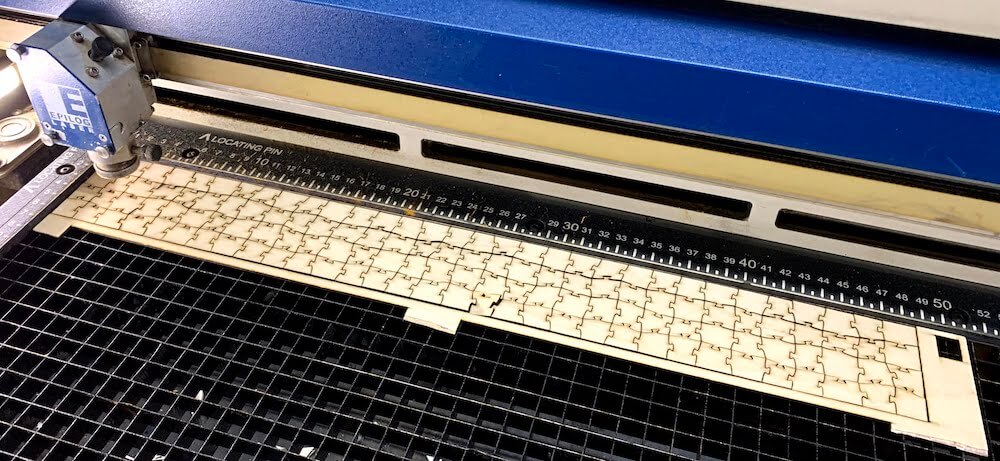
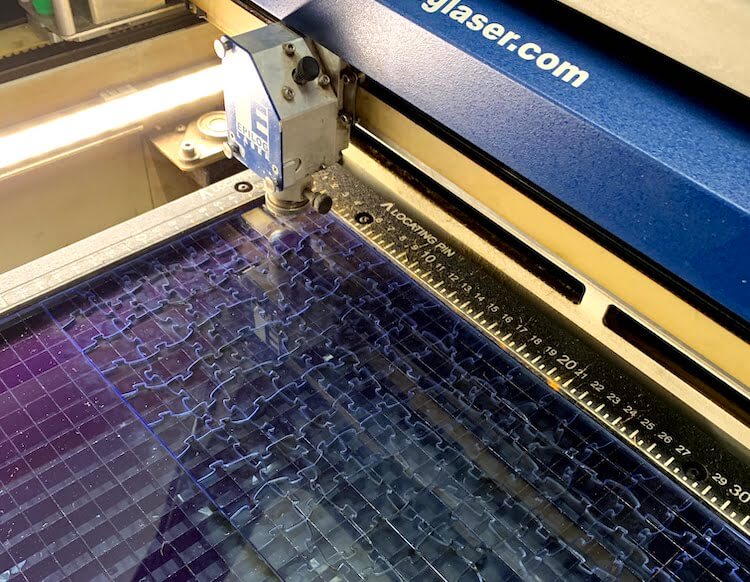

It even cuts plexiglass! This machine is seriously so cool.
Fun failures
Let's agree to call these generative art.
Possible improvements
If I have more time, I would like to improve several things:
- My initial Voronoi approach could also generate truly random pieces3. It would be cool to put in some logic to avoid the tongue pieces intersecting. It should also avoid generating pieces that are too small.
- This tool could easily be made into a website where you set the parameters interactively.
- With low enough perturbation, the pieces are actually not unique enough. Some of the puzzles I made are quite tough to solve.
- I would like to randomise the shape of the tongues a bit. It wouldn't be too hard to make some thinner or slanted, and this would help a lot with making each piece unique.
- I could engrave the next puzzle, making it pretty and slightly easier to solve.
Feel free to send me pull requests if you happen to hack on my code.
That's it.
LASER!
(Laser)
You don't need to own one, check your local maker spaces. There is one at a community workshop in my city, and a friend was nice enough to teach me how to use it.
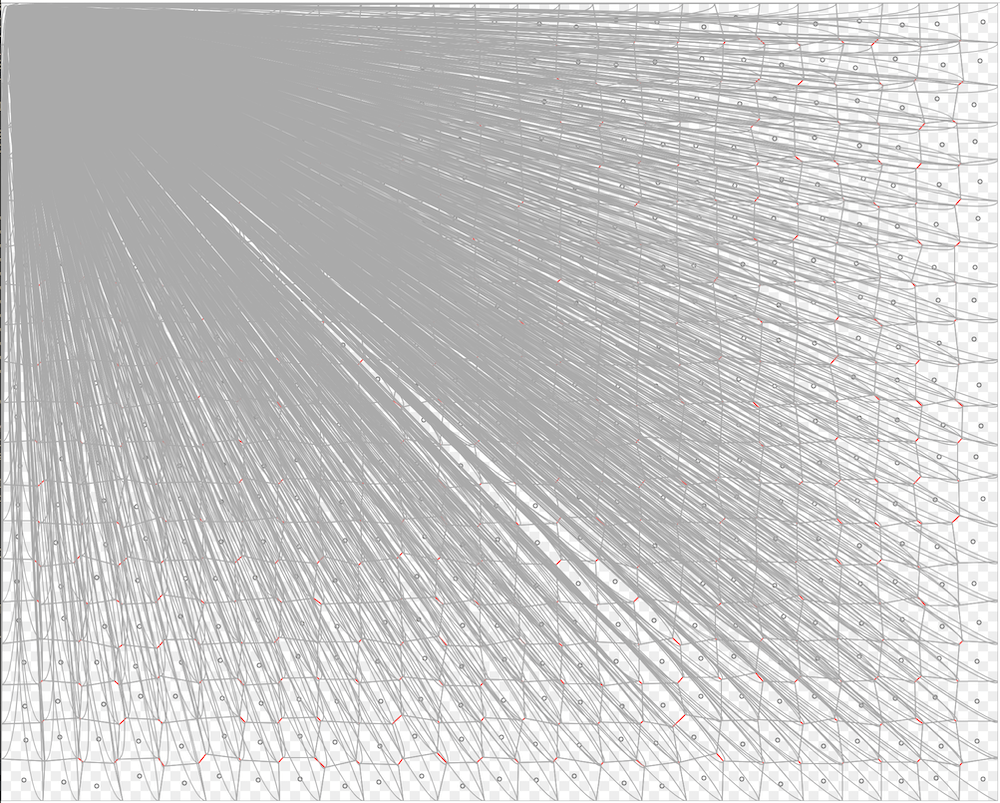
One problem was how the paths in the generated svg were laid out. In particular, the first time I went to cut out my puzzles, I learned that the algorithm to generate the cutting path is not particularily fancy. If you've ever looked at the source code for an SVG file, you've noticed that it's just a bunch nested of XML elements, which describe the rectangles, circles, Bézier curves, and other shapes.
It turns out that the laser just cuts the path in the same order as they appear in that file. This works fine for small puzzles, but for larger ones this means that the head has to jump around a lot if the path order is quite random.
Long story short, my paths were in a pretty random order, so the cutting time estimate on the machine for a medium sized puzzle was 30min. This wasn't feasible with the way the machine is rented out. So I decided to go back and optimize the path generation to somehow group long chains of consecutive sub-paths together.